If you connect and power on a USB printer, a dialog pops up.
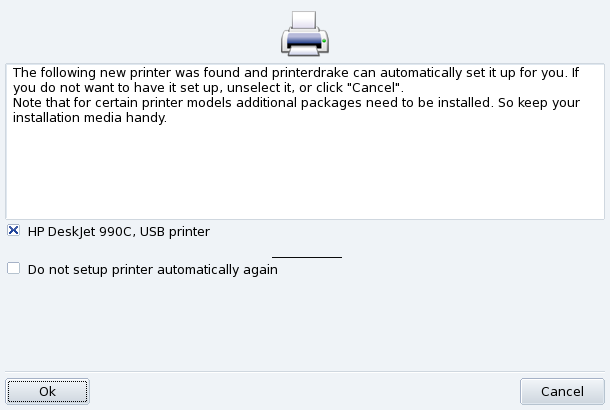
Deactivate Automatic Detection. If you don't want the “automatic setup” popup to show again, check Do not setup printer automatically again.
Then just click , all required packages will be installed, and the printer configured for you to let you use it right away: nothing else to do!
Configuration. It is however recommended that you check the printer default parameters, especially paper size. To do this launch PrinterDrake from the Mandriva Linux Control Center and follow the instructions from Section 7.6, “Reconfiguring an Existing Printer”.
![[Tip]](images/tip.png) |
Tip |
|---|---|
If you have just installed a printer that wasn't available when you installed Mandriva Linux, make sure it is correctly connected and powered on before launching the configuration tool. |
When you first launch the PrinterDrake tool, it may be in one of these states:
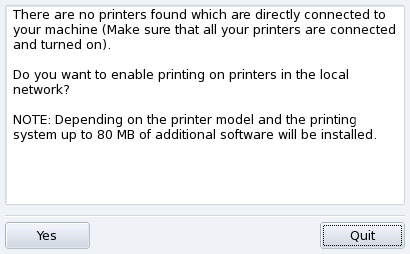
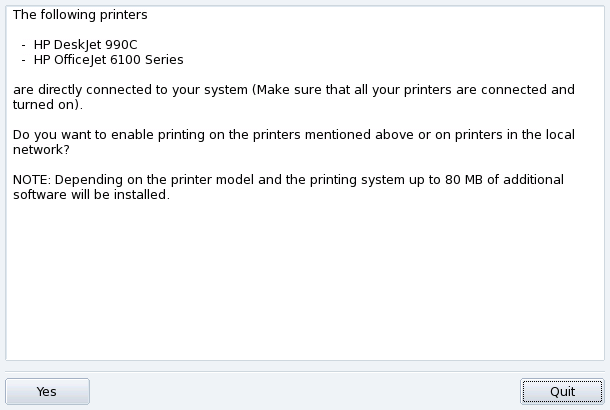
The tool did not detect any local printers. However you can print on network printers, or manually installed printers which weren't detected by clicking on .
-
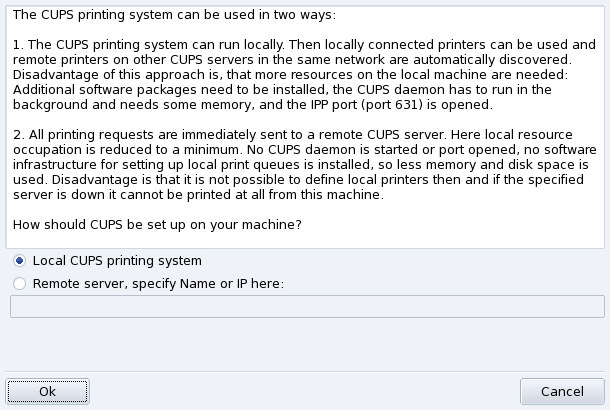
Select the Local CUPS printing system option if you wish to configure your machine to act as a print server for either a local printer which was not detected, or a networked printer connected to your local network.
Any required software will be installed and then the main configuration interface (see Figure 3.13, “Managing Printers”) appears. Click on to install the network printer.
-
Select the Remote server option if you wish to be able to print on printers served by another CUPS print server on the network. Your applications will immediately have access to all public printers served by that server. You only need to provide the hostname or IP address of that server in the field (ask your system administrator).
When this is done, the main configuration interface (see Figure 3.13, “Managing Printers”) appears. The Configured on other machines tab will be filled with the available network printers.
The following window appears when PrinterDrake detects a new printer at launch time.
Simply confirm the automatic installation of the new printer. The main configuration interface (see Figure 3.13, “Managing Printers”) is then displayed. Make sure you check that the printer parameters fit your needs (see Section 7.6, “Reconfiguring an Existing Printer”).
The main configuration interface (see Figure 3.13, “Managing Printers”) is shown. Make sure that the printer parameters fit your needs (see Section 7.6, “Reconfiguring an Existing Printer”).
Local and Remote Printers. Use the printer configuration tool's first tab for locally connected printers (Configured on this machine), and the other tab for printers available on your local network (Configured on other machines).
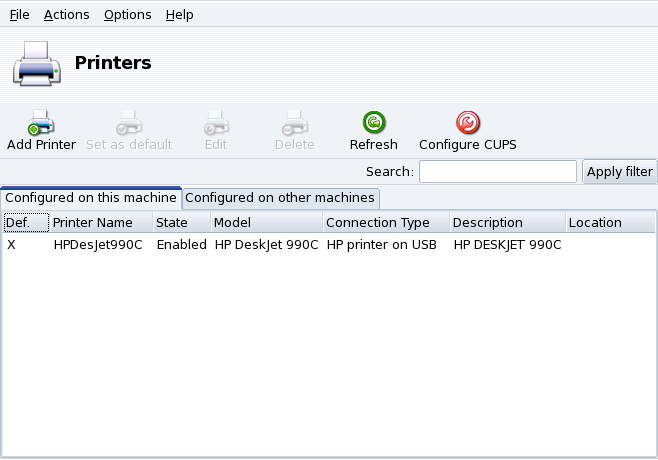
The following buttons give you access to all available maintenance tasks:
: launches the printer configuration wizard described in Section 7.5, “The Printer Configuration Wizard”.
: sets the selected printer as the default printer when no specific printer is chosen at print time. A cross appears in the Def. column of that printer.
: opens the printer configuration dialog described in Section 7.6, “Reconfiguring an Existing Printer”.
: removes the selected printer from the available printer pool.
: updates the list of available printers, especially useful for networked printers.
: by default, your system is open. PrinterDrake uses all of the network's available printers and shares all of its local printers with the local network. Click on this button if you don't want to access network printers, or if you want to restrict the access to your local printers. This dialog also lets you configure access to print servers outside the local network (see Section 7.4, “Print Server General Configuration”).
![[Note]](images/note.png) |
Note |
|---|---|
The → menu adds extra features to the tool. See Section 7.8, “Expert Mode”. |
The button allows you to control the behavior of printers connected to your machine and to your network.
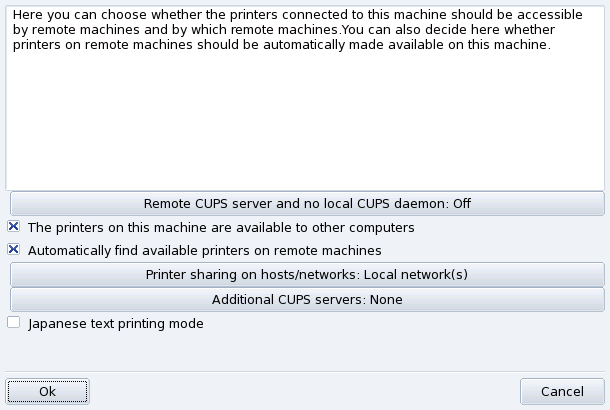
This dialog enables you to switch between the client and server printing modes through the button.
This button enables you to select between two remote server access methods.
In the first method your server must have a CUPS daemon running
and be listening on port 631 in order to manage the print queue and to listen for jobs coming in from applications. In
this case the CUPS server broadcasts its presence to the entire network.
This is the default configuration.
In the second method, the CUPS daemon is still required to manage the queue and to handle jobs
coming in on port 631, but it does not broadcast its presence to the network. In this case the
clients do not need to run a CUPS daemon, instead they have a configuration file which contains
the IP address of the server. In this way the clients know they can sent jobs directly to the IP address.
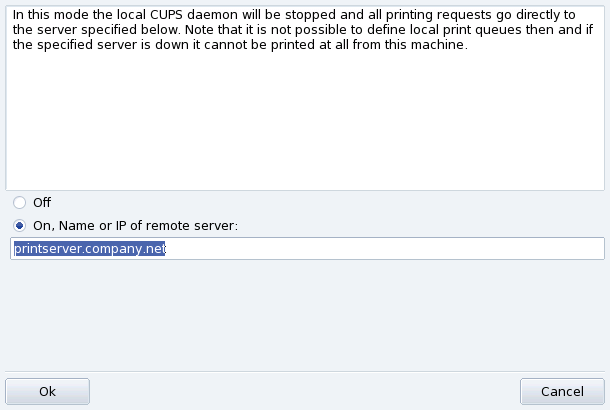
Select the On option to connect to another printer server. Then you only need to specify the name or IP address of that server in the next field below.
If you choose this mode, your printing configuration is now finished. Accept the options by clicking the buttons, and you will be able to check the list of available printers in the Configured on other machines tab of the main interface (see Figure 3.13, “Managing Printers”).
If you want your machine to access locally connected printers (through parallel or USB ports), or network printers not already configured on another server, you need to select the Off option. Click to fine tune your printer server (see Figure 3.14, “CUPS Printer Server Configuration”).
A number of options are available to further secure and enhance your print server features:
- The printers on this machine are available to other computers
Allows other computers to print on printers configured locally. Remember to restrict access by clicking on (see below).
- Automatically find available printers on remote machines
Tells your print server to automatically make all printers found on other servers available to the local network, as if they were locally connected to your print server. This way your system's users are able to print on any printer the print server can “see”. If the remote printers you intend to use are served by a server not on your local network, you can still tell the print server to use them with the button (see below).
Allows you to specify from which networks the local printers are made available.
Allows you to specify one or more CUPS servers to which you can connect and access printers. Specify the IP address and port of the CUPS server in the dialog.
- Japanese text printing mode
Replaces the original text filter for one more suited to Japanese texts, but with less features. Use it if you have to print Japanese text-only files.
Click on Add printer and the configuration wizard comes up.
The first step serves to either specify an access address to a network printer, or to activate auto-detection of locally connected printers, network printers, and finally printers served by SMB (Windows®) servers.
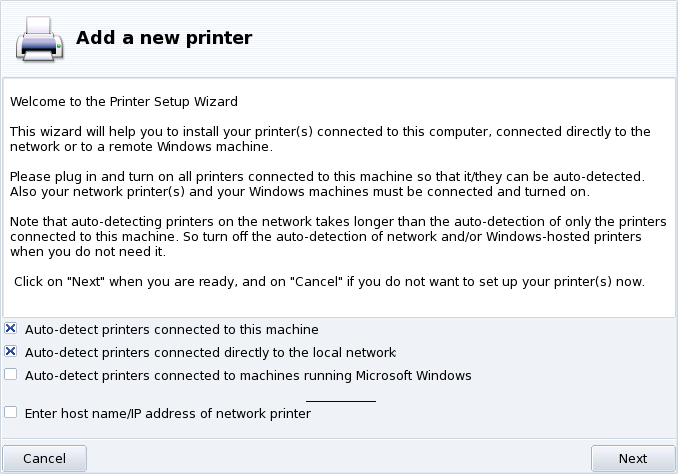
Specifying the Location. If you happen to know all parameters required to access a specific network printer, select Enter host name/IP address of network printer. Configuration steps are then similar to the ones involved in auto-detection procedure.
-
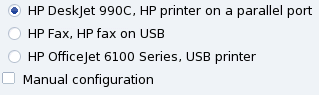
Choose the Printer to be Configured
Select the printer you want to add from the list of detected printers. If the detected printer isn't the correct one check the Manual configuration box and proceed with the printer model step. If autodetection fails, remove the check mark from all check boxes, click on and follow the instructions below.
-
Specifying the Driver Manually
PrinterDrake displays your printer's model name. Choose Select model manually if it's incorrect. Select the printer you have or a compatible one (see Section 7.5.2, “Choose the Printer”) if yours is not specifically listed.
-
Manufacturer-Supplied Driver
If you want to install the driver supplied by your printer manufacturer, click on the button and select the medium containing the PPD file and browse to it. Accept subsequent dialogs to use your chosen PPD file.
-
HP Multifunction Devices
If you own a multi-function device such as those of HP or
Sony, an information window pops up and gives you information about your scanner and scanner software (Section 8, “Installing and Sharing Scanners”). Additional required packages are also installed.Fax Virtual Printer. If your device also provides fax functions, you are given an option to create a virtual fax printer that will actually queue the printed documents so they can be later sent via fax.
-
Optional Configuration Step
If your printer has optional add-on devices (finishers, extra paper trays, etc.), you are asked which features are actually installed.
Several test pages are available (see Figure 3.18, “Testing the Printer”). We recommend you print at least one test page so you can immediately correct the parameters if something is incorrect. The printer should begin to print almost immediately.
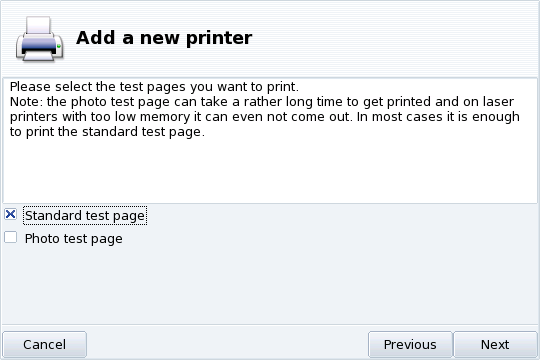
If you're not satisfied with your test page, answer the appropriate question with and you will be led to the printer configuration menu (see Figure 3.19, “Modifying an Existing Printer”) where you can correct the settings. See Section 7.6, “Reconfiguring an Existing Printer”.
Your printer will now appear in the list of available printers in the main window (see Figure 3.13, “Managing Printers”).
Double-clicking on a printer's name in the list, or clicking on the button, displays a menu where you can choose actions to take on the selected printer (Figure 3.19, “Modifying an Existing Printer”). You can change the printer name, options, etc.
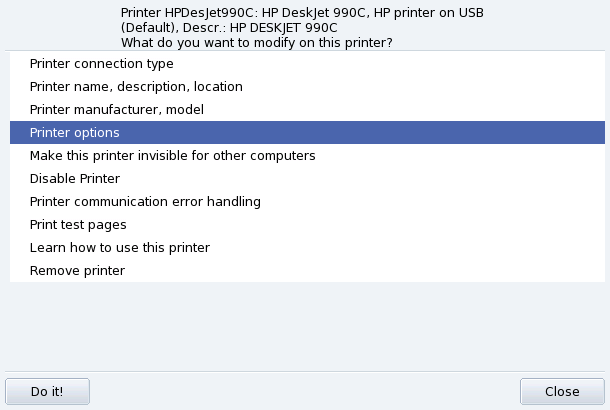
Here are some of the most useful entries:
Printer name, description, location. If you have many printers around it is better to give them explicit names, and meaningful descriptions, plus a location so people don't end up looking desperately for their printouts in many floors.
Printer Options. Shows the different options available for that printer (paper size, printout mode, etc.), so you can set a default value for them.
Make this printer invisible for other computers. Printers are normally made available to other computers in the local network. Using this option you can disable this behavior for the currently selected printer.
Disable Printer. Use this option to remove a printer from those to the system's users. You might need to temporarily disable a printer under maintenance so that users don't try to use it in the meantime. When a printer is disabled, that option changes to Enable printer.
Learn how to use this printer. Displays information on how to use a particular printer model. In the case of a multi-function device from HP, additional information for the “extra” functions is also displayed.
Remove printer. Deletes that printer's configuration from the system.
Select an action in the dialog and then click on the button to perform it.
Open the → menu to go to the automatic installation options form.
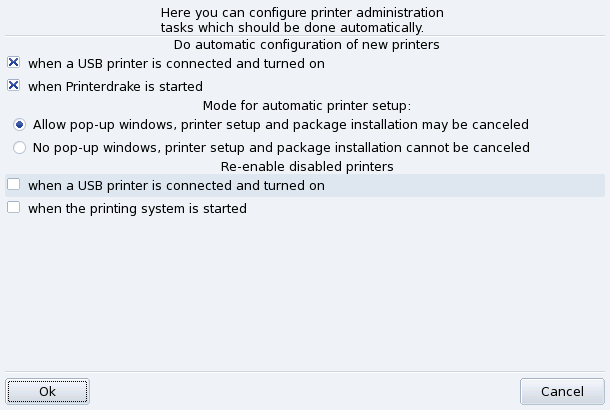
You can here configure whether new printers should be automatically detected, automatically configured, etc.
The expert mode activates additional features in the application.
More Technical Installation Wizard. The installation wizard displays more technical information and allows you to configure printer name and other options directly from within the wizard.
Choose a Different Printer Driver. Different drivers are available for the same printer. In expert mode, a third level appears in the printer model selection list (see Section 7.5.2, “Choose the Printer”) letting you change each printer's driver.
No Automatic Configuration. If PrinterDrake is in expert mode, it doesn't automatically configure new local printers on start-up. Use the button to configure the printer. However you can choose to from the menu to override that behavior.
Automatic correction of CUPS configuration. This new option appears in the CUPS server configuration window (Figure 3.14, “CUPS Printer Server Configuration”. It is activated by default. Leave the mouse over the option name to get more information about what it does.