 |
MODELLING A GLASS
By Olivier Saraja |
 |
|
MODELLING A GLASS
By Olivier Saraja |
|
We will add a texture to our material, in order to affect the color, reflection or transparency (alpha) values of our glass. The results will certainly not be realistic, but will appear realistic enough to please the eye of an artist.
First make sure that the glass is selected, and then call the Texture
Buttons (F6-KEY). Add a new texture with the ![]() button. Feel free to rename this texture 'Alpha' or something like this.
Choose 'Blend' as texture type and 'Halo' as blending method.
button. Feel free to rename this texture 'Alpha' or something like this.
Choose 'Blend' as texture type and 'Halo' as blending method.

Call back the Material Buttons (F5-KEY). The Alpha: 0.050 value that we chose in the previous step would have been good enough if we wouldn't go further. But in this specific step, we will choose Alpha: 0.000 because it will give us far better results later.
Let assign the texture to the proper canal. Fist of all, define the color of the texture with the R, G and B sliders, that all should have a value of 1.000. Other values prove to be great for colorful glasses. Feel free to try any hue of blue, green, yellow... Then, tell Blender that the texture should affect the Col and Alpha channels of your material. Leave the Col 1.000 slider to its default value (of course, you can decide to decrease this value if you want to get colored glass, according to your taste and the needs of your scene) but decrease the Var 1.000 slider to the Var 0.5000 value, which should soften the alterations due to the activation of the Alpha channel. The mapping of the texture should conform to the following settings, for a better rendering effect : mapping along Nor and Sphere, and remapping of the texture components in the Z only direction (the other directions are desactivated : thus, you can be sure that the texture color will only affect the outter edges of your rounded object).
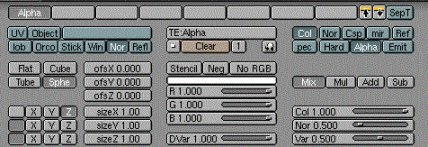
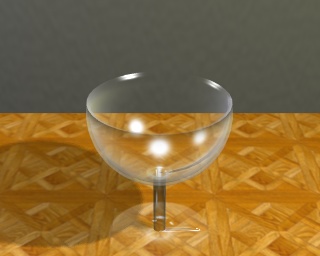
Feel free to play with the Mul, Add and Sub buttons, as their results can be far more interesting than the standard Mix button. Try also to activate the Emit channel, in addition to the Col and Alpha channels. The look of your glass will be slightly enhanced, at the price of a light radiance in the dark parts of your scene (this solution is only appropriate in well lighted scenes, such as the one depicted bellow!).
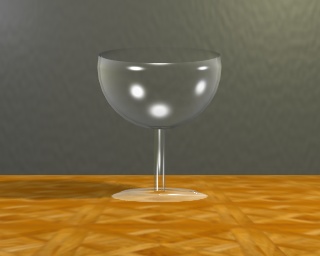
Anyway, we are now able to produce the following results, far more satisfying than the results fro the previous step, aren't they ?
 .
.
We have now reached the limits of my skills on this topic, and we can
hardly do better during this tutorial. However, there's still something
that we can improve to give our scene a better realism. Let's move
on the next step !
|
|
|