![[Note]](images/note.png)
When launching Rpmdrake you have to wait a few seconds while the package databases are scanned. Then you are presented with Rpmdrake's main interface.
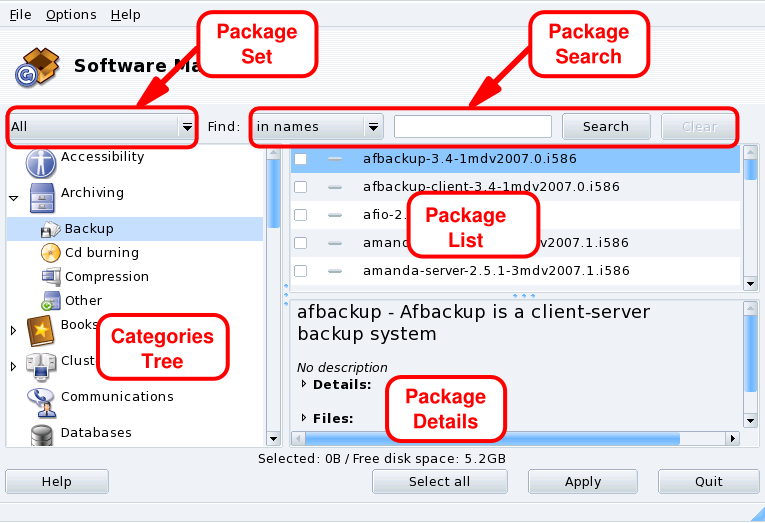
Package Set. Use this pulldown list to select the types of package to be displayed: all of them (installed or not); only installed ones (to be uninstalled); only uninstalled ones (to be installed); and a few options for updated packages (all, security fixes, bug fixes, normal updates). Each time a package set is selected, the Categories Tree is rebuilt to display matching packages only.
Package Search. If you are not sure about a package name, use this facility to search for it. Type the string to be searched for, select the criteria using the pulldown list, and click . You can search for package names (in names), package descriptions (in descriptions) and the package providing a given file (in file names).
Categories Tree. To ease management, packages are classified into categories (Networking, Office, Games, Development, Graphics, etc.). Open a category to display packages which match the current criteria set using Package Set and Package Search.
Package List. Where currently matching packages (Set, Category and Search Criteria) are displayed. This is where you select packages to be installed, removed and upgraded.
Package Details. Displays details about the currently selected package in the Package List.
Procedure 5.1. Actions on Packages
-
Limit List of Packages Displayed
Use the Package Set pulldown list, the Categories Tree and, optionally, the Package Search facility to browse for packages to be installed, removed or updated.
-
Select Packages
In the Packages List, select packages to be installed, removed or updated. If the checkbox by the package name is empty, it means that the package can be installed or upgraded, once selected it will be marked with the
 icon. If the checkbox by the package name has
the
icon. If the checkbox by the package name has
the  icon, it means the package is
already installed, select it for removal and it will be marked
with the
icon, it means the package is
already installed, select it for removal and it will be marked
with the  icon.
icon. -
Apply Changes
Once you are satisfied with your choices, click on to perform the actual install, remove and upgrade of these packages. A new window appears, where you can see the progress of actions being taken. If you prefer to leave without doing anything, you can just click on .
Handling Dependencies
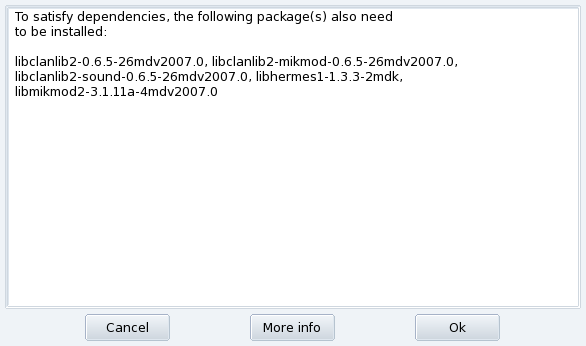
It may happen that you select a package which requires dependencies (additional libraries or another tool) or which is a dependency of other packages. In this case Rpmdrake displays an information window allowing you to choose whether to accept the selected dependencies, to the operation, or to get on the operation (Figure 5.3, “Dependency Alert Box”).
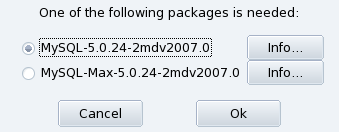
Alternative Dependencies. You may also want to install a package which requires dependencies, and various packages are capable of providing that dependency. The list of alternatives is then presented (Figure 5.4, “Alternative Packages”). You may read the additional information presented by clicking the button to help you choose the best alternative.